

Now what is the most efficient route for embarking on a cheese curd, fries and gravy quest over a meager three days? Enter the holy grail of usefulness, Google Maps.
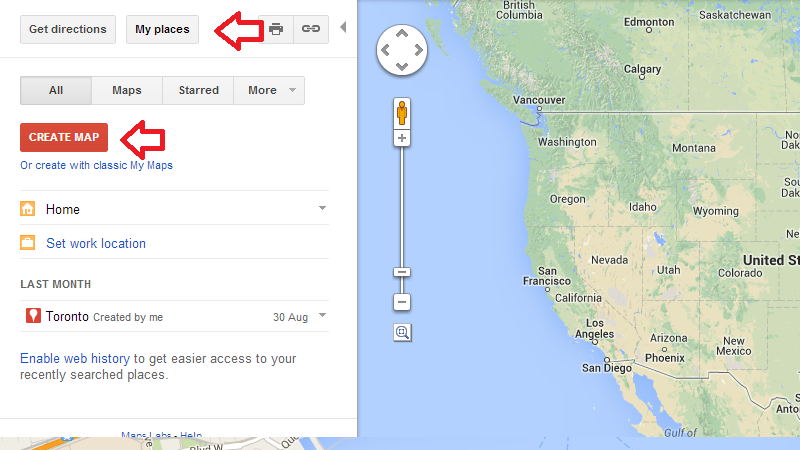
Creating your own custom Google Map—probably one of the most super under-utilized tools ever in travel planning—is about almost perfect for visualizing out routes between multiple destinations. Maybe because the option to create your own map is usually located under "My places," it never actually occurred to me that it would be useful on my trips.
Itinerary planning seems to be one of those things you can't efficiently outsource to a computer yet. It generally requires a couple of things: Knowing where I’m staying, where I would like to go, and where exactly all these places are in a city that I have absolutely no idea about.
The best part about it is that you can get as detailed as you like or as general as you want, depending on how you scale your map.
How to build a custom Google Map (with example)
I wanted to give the whole thing a test run, so when I popped off to Canada last week, it seemed like the perfect opportunity. The first thing you’ll need to do before you do anything else is to name the map, so I picked something that would make sense — “Toronto” seemed to do the job pretty well.
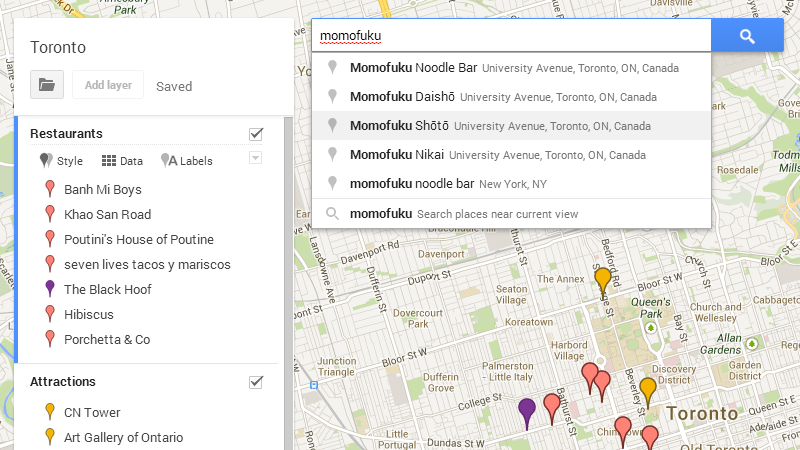
I quickly set the city as its base location by making a broad search for Toronto, Ontario thus setting it as the basis for all my future searches. It was now time for my poutine-butgusting itinerary to be documented.
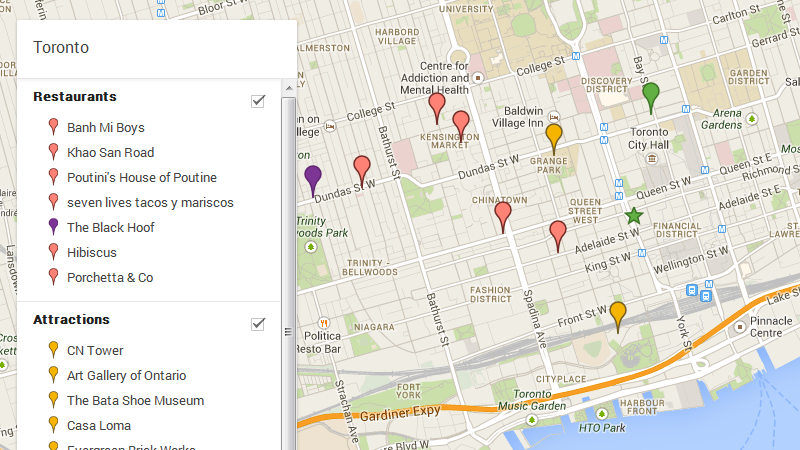
If you’ve ever played around with Adobe Photoshop, the first thing you’ll notice is that you can create several “layers,” or in this case, a way to group types of locations. Unfortunately, you can only have up to three layers, so we had to pick three logical ways to organize all the places. These layers ended up being naturally labeled Restaurants, Attractions, and Other.
To make things easier, Google has placed a small toolbar just below the search box. There are three main actions: select, add a marker, and add a line. Two other actions, redo and undo, will help you customize your map further.

For the most part, you’ll be adding markers. After you click on the appropriate button to do this in the toolbar, click on the layer (the “group”) in the left-hand column where you want said restaurant, etc. to appear in.
For example, searching “Momofoku” returns Momofuku Shōtō, a fancy schmancy restaurant run by New York chef David Chang, as an option. The pop-up displays any pertinent data, such as the store’s address, phone number and website on the map as a green marker. Within this pop-up bubble, you’ll see the option to “Add to map.”
If you haven’t figured it out, clicking on this link is like saying abracadabra! and magically places it on your map.
When each marker is added, there will be the option to play around with it. For instance, it is possible to add notes about each location, while adjusting the color and the shape of the marker. This is done by clicking on a paint-bucket icon that is displayed when hovering over the name of a place in the left column.
In my particular map, I’ve set the The Black Hoof, a restaurant that was featured on Anthony Bourdain’s The Layover, as a purple marker to indicate that it is a special eat: who doesn’t want to eat bone marrow? Sooo decadent!
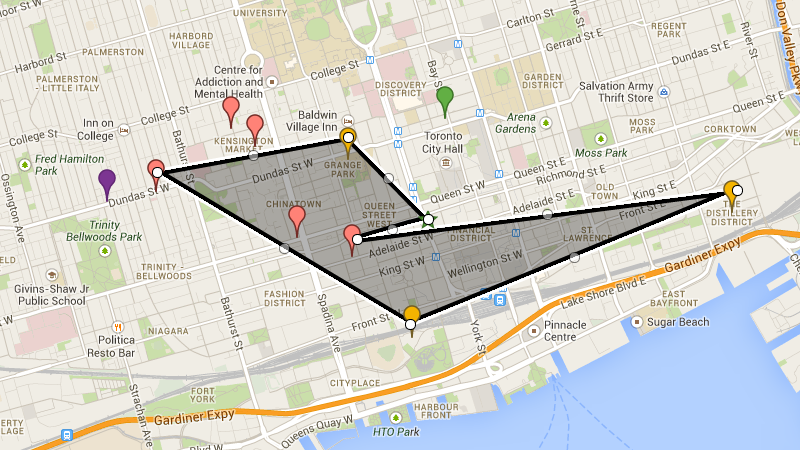
The best part is that you can draw lines throughout your map—the action for this can be found in the toolbox; it is also placed in a layer—to indicate a particular route. You can change some of this line’s key attributes as well, including color and transparency.
I’ve found that this generally works better for planning one route rather than several routes, depending on how complicated you want your map to get.
To get the actual directions between two or more attractions, though, you’ll have to unfortunately use the regular version of Google Maps.
The other features available for custom Google Maps
It should come as no surprise that there are several map views available. There’s the typical Google Maps default view, or if you’re feeling adventurous, you can switch it to a satellite or terrain view.
Clearly, this is a highly personal decision that you’re going to have to make; personally, I’m still upset that there is no poutine view. C’est la vie.
The map is then shareable to anyone you choose, which is great for showing friends and family what’s up in an area. Basically, it’s a good way to see where all of your intended destinations are in relation to each other so you can plan routes accordingly.
Though there are bundles of trip management services like WorldMate and TripIt around, they don’t really help with the most efficient routing which is still very much a human effort.
The main downside of the map is being able to use it while you’re traveling is where Google seems to really fall off the high horse. Practically, it is nearly impossible to get the actual map to show up on a mobile device, either through the Google Maps app or through the desktop version — this would come in real handy when you’re blithely walking through the streets, wouldn’t it?
Instead, I ended up taking a close-up screenshot of the map, which I uploaded to my phone and later used while traipsing through Toronto. The only other options included an old-fashioned printout in conjunction with a good fanny belt, cool not included.
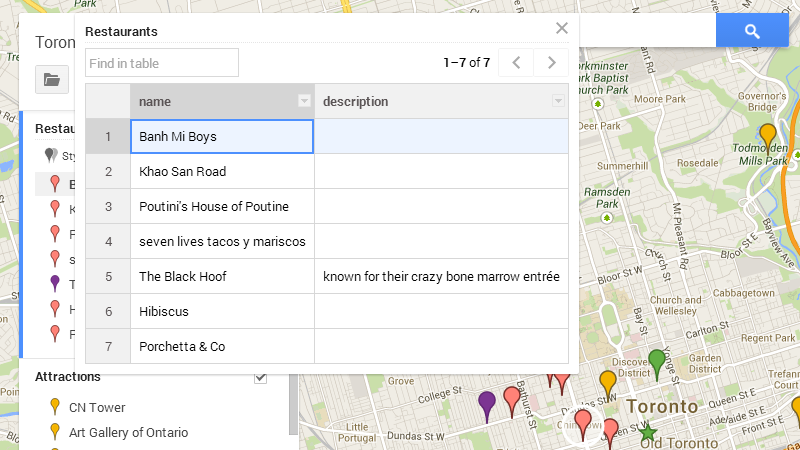
Another really poorly thought-out feature of Google’s custom maps includes its exporting abilities. Though you can dump it out to a KML file (which is mostly great for Google applications) and see every location in a layer presented as a table, there is no known way to export the list of destinations and its accompanying information to a more populated list of some kind, either in Excel, Word or something that resembles anything remotely useful.
Unfortunately, these are definitely half-assed Google development issues more than anything else.
The only other gripe? Google's inability to find a bathroom after my sixth meal of the day.
